
- Introduction
- Get Home Assistant Software
- Resources
- Customize your home page
- Save your configuration
- FILE EDITOR
- Home Assistant tips and tricks
- Remotely access to Home Assistant (from Internet)
- Suggested kit for install Home Assistant
- Introduction to Home Assistant Automations
- Third party add-on or plug-in for Home Assistant
- ESPHome for drive EPS8266-01s or EPS8266-01 in Home Assistant
- Example of automation for Garden Irrigation
- ConBee II ZigBee gateway + XIAOMI – AQARA, sensors & actuators
- Increase the reliability of your Home Assistant using an SSD
Introduction
Normally a Home Automation is based on different HW/SW tools because we install it in our house, during the years, some different brand solutions for gate opener, lighting, home alarm, etc.
The ideal solution would be to design home automation system from scratch to simplify the installation of the various parts but this is only possible when building a new home.
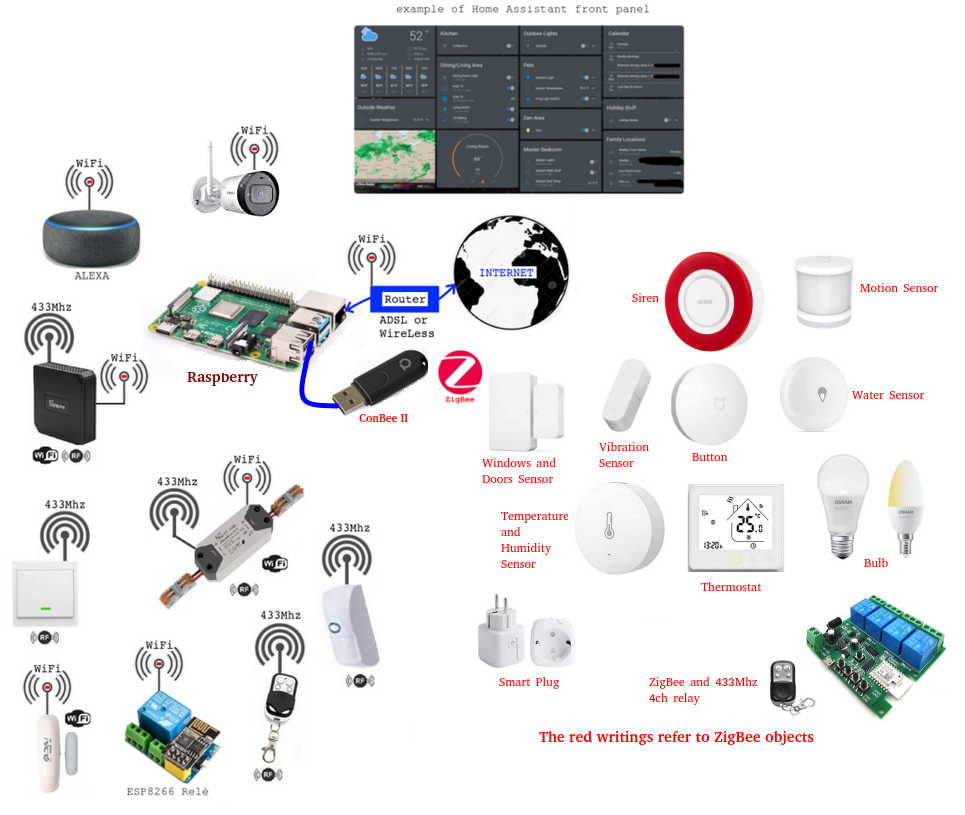
We suggest Home Assistant for control all the objects present in our home, the HW that we suggest is here.
By Home Assistant is possible create a network that control and make interoperable between them all those objects present in our home.
Home Assistant is compatible with a loot of brand like: Amazon, Google, IKEA, Philips, Xiaomi, SonOff, etc.
NOTE: We suggest to connect your Raspberry by a LAN cable to your router or access point.
This for guaranteed a high level of security issue.
Home Assistant is a software package for Raspberry that permit to create a environment (network) where you can include and control a lot of hardware (HW) of different producer in a unique interface for automate your home.
Note: some device for use in local mode, without the access thru Internet, must be reprogrammed, see for example the tutorial regarding the EPS8266-01.
NOTE
Some devices listed above working in WiFi and other use the ZigBee or Sub1Ghz.
For the ZigBee devices is necessary a bridge (ZigBee/WiFi) and we suggest to use the ConBee that is a USB key (must be inserted in our Raspberry) that is compatible with all ZigBee devices.
For the Sub1Ghz devices is necessary a bridge (Sub1Ghz/WiFi) and we suggest to use the SonOff 433Mhz/WiFi that is compatible with all 433MHz devices.
For home automation we suggest to use ZigBee object for the distance covered thank to Mesh and for the low latency.
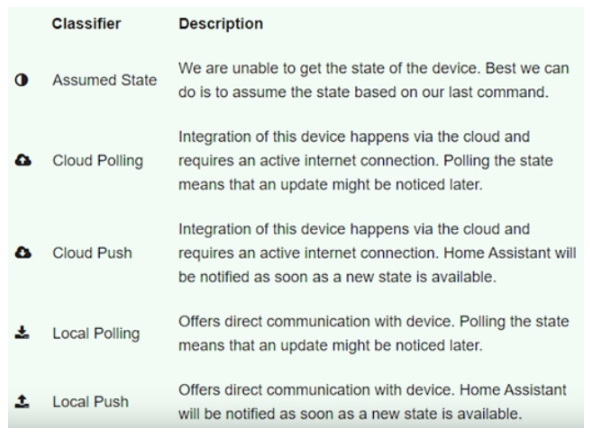
There are two ways of managing devices which are: CLOUD and LOCAL.
CLOUD mode uses the device manufacturer’s servers and Home Assistant will do the same.
LOCAL mode uses our local network (local WiFi) and therefore there is no problem if the Internet does not work.
All of this HW are connected and controlled, via WiFi, directly from the Raspberry.
In any case you can control you HW objects also via Ethernet.
We think that an automated home must be able to react autonomously to the various inputs that it perceives through the sensors without necessarily having to connect to the Internet also because in some moments it could happen that the Internet connection is missing.
There are two way to operate with your devices and are: PUSH and POLLING.
In PUSH mode if an object change status immediately send a notification to our Raspberry.
In POLLING mode you (Raspberry) must interrogate your object for know the status.
Of course is clear that is preferred to use our Raspberry in LOCAL PUSH mode.
You access to your Home Assistant via Web Server that is installed in the Raspberry, this means that you can access to Home Assistant via PC, Smartphone, Tablet, etc.
For Android Smartphone is available a dedicated Home Assistant App.
The same is for IoS but seems that some functionality not working properly.
A theoretical Home Assistant network is shown below.
Get Home Assistant Software
The official page of Home Assistant is here.
The official page of Home Assistant installation procedure is here.
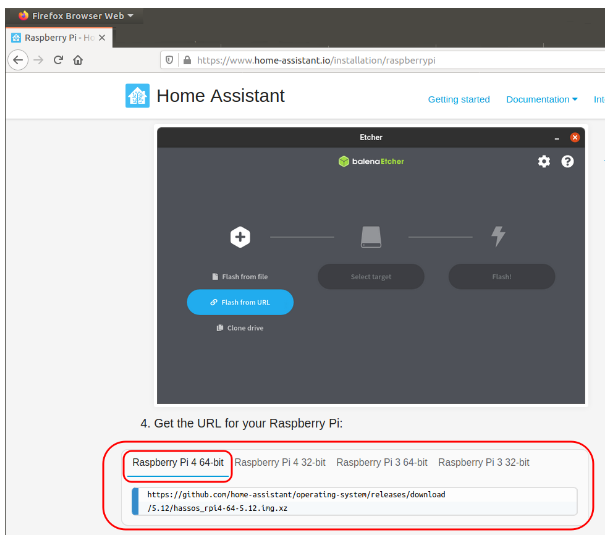
We suggest to use the 64 bit distribution because if in future you think to use a SSD this is possible (up to now) with only the 64 bit distribution.
Below there is our suggest installation procedure.
We chose for implement our Home Assistant the RASPBERRY PI 4 Modell B (64bit, 4GB ARM-Cortex-A72 4X 1,50 GHz, 4 GB RAM, WLAN-AC, Bluetooth 5, LAN, 4X USB, 2X Micro-HDMI) but is it possible use other cheaper models, see below.
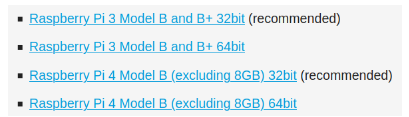
The image to download for RASPBERRY PI 4 Modell B 64bit 4GB is: Raspberry Pi 4 Model B (excluding 8GB) 64bit
We suggest to use a ENDURANCE MicroSD of 64 GB, for example this.
Flash the downloaded image to an Micro SD using balenaEtcher.
After you are prepared your micro SD insert it in the RASPBERRY PI 4 Modell B 64bit 4GB, connect an Ethernet cable and Power On.
At this point open a browser and type:
hassio.local:8123
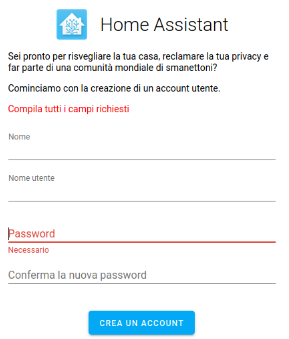
if all is OK you must see the first page of your Home Assistant, see below.
In this page insert:
Name, User Name and Password and click on CREATE ACCOUNT and follow the instructions.
ATTENTION:
Some router don’t support the address: hassio.local:8123
if you are in this situation do this:
Find manually the IP of your Home Assistant using for example:
On Android FING
On Linux: the: NMAP command
On Windows: Angry IP Scanner (Free)
RESOURCES
Here there is a series of video in Italian language that explain how to install and how to use the Home Assistant (hassio).
See the new series that started in year 2021.
Video n.1, Video n.2, Video n.3, etc
Go here for Download and install Home Assistant, there is also a tutorial in English language.
More info and tips and tricks are here.
Customize your home page
For customize your home page you must click on the:
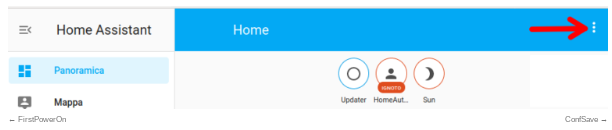
Next choose: CONFIGURE GUI
From the page that appears choose the + button.
From the page that appears choose ENTITIES

From the page that appears choose a NAME (below the name is ESP8266) and add/remove the ENTITIES that you need to show in this box.
At the end click on SAVE
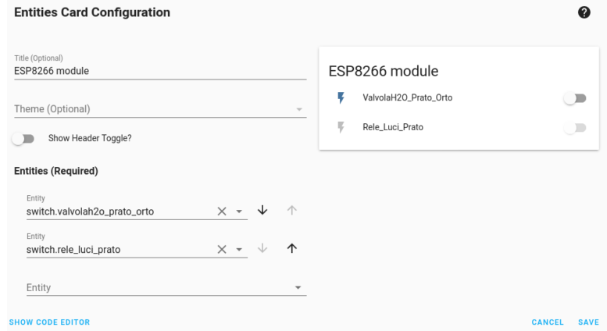
For exit from this menu click on X.
Save your configuration
For save your configuration do this:
Select: SUPERVISOR -> Snapshots
next follow the indications.
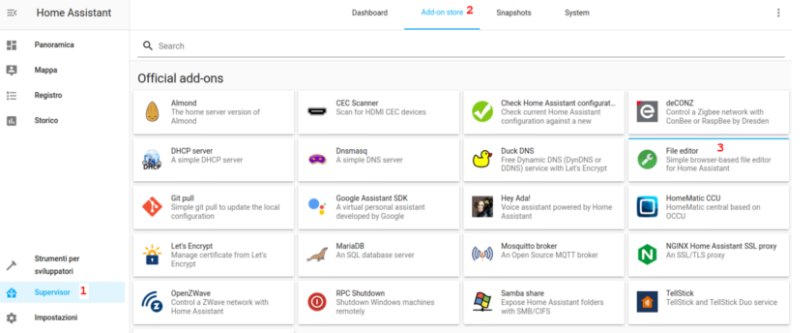
FILE EDITOR
We suggest to install the: FILE EDITOR
that is useful to edit the configuration files of Home Assistant.
For do this choose: SUPERVISOR -> ADS-On STORE
Home Assistant tips and tricks
Please see here.
Remotely access to Home Assistant (from Internet)
Please see here.
Suggested kit for install Home Assistant
Please see here.
Introduction to Home Assistant Automations
Please see here.
Third party add-on or plug-in for Home Assistant
Please see here.
ESPHome for drive EPS8266-01s or EPS8266-01 in Home Assistant
Please see here.
Example of automation for Garden Irrigation
Please see here.
ConBee II ZigBee gateway + XIAOMI – AQARA, sensors & actuators
Please see here.
Increase the reliability of your Home Assistant using an SSD
If you need to increase the reliability of your Home Assistant system, is suggested to use an SSD instead of the uSD.
Here there is a video that explain how to do, is in Italian language.
Here there is the complete list of the: Nuova Domotica 2021 (in Italian language) concerning Home Assistant from zero.
We suggest also to see the: I pensieri dell’architetto (in Italian language) that explain in deep how to configure Home Assistant.