
You find it here.
ENGLISH Language
A new TIMER must be charge for 12 hours (is the internal battery time to recharge).
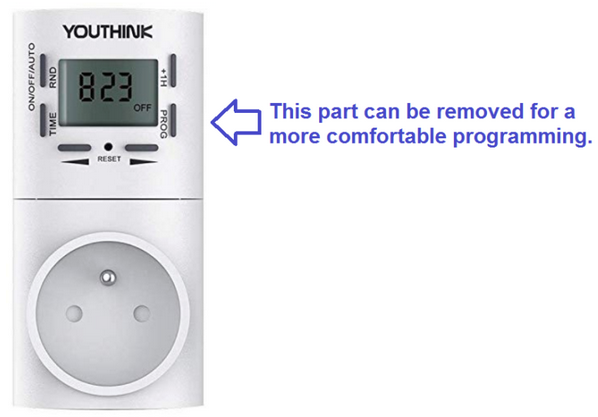
It is good practice to press the RESET button before starting to program the timer. For do this use a toothpick or a sheet clip after opening it.
Programming the Time and Day of the Week
Keep pressed the button TIME until the dots that divide the hours from the minutes don’t flashing.
At this point you can set the DAY using the ARROW keys, they are those placed horizontally next to the word RESET.
To pass to program the TIME, press TIME button and the HOUR will flash, you will change it using the ARROW keys.
To go to program the MINUTES press TIME again and you will change the minutes using the ARROW keys.
To END press TIME for a long time until the two points that divide Time from Minutes flashing.
Alternatively, waiting about 10 seconds and the Timer go back and will display the time (the two points between hours and minutes will flash).
EVENT programming (PROG)
At most you can program 8 events.
Press the PROG key and on the display you will see: PROG 1 ON
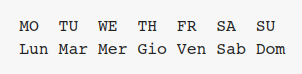
1) At this point you have the display with the day that flashes and pressing the ARROW keys you can choose the DAY or the WORKING WEEK (Monday … Friday) or WEEKEND (Saturday and Sunday) or the ENTIRE WEEK (Monday … Sunday).
2) At this point, press TIME button to switch to program the HOUR, use again the ARROW keys to change the hour.
3) Press TIME again to set the MINUTES.
Adjust the minutes with the ARROW buttons.
Once the setting of PROG 1 ON is completed, press TIME and you must see, on the display the label: PROG 1 OFF
To set PROG 1 OFF repeat steps 1, 2 and 3.
To go to the other EVENTS (PROG 2, 3,4 … 8) press TIME and repeat the steps above.
To exit, press PROG for 5 seconds or wait for about 10 seconds and Timer will display the TIME again.
CAUTION
The word AUTO should appear on the TIMER display. If it does not appear, press the:
ON/OFF/AUTO/RND button repeatedly until on the display appear AUTO label.
ITALIAN Language
Quando si riceve il Timer lo si deve lasciare in carica per 12 ore così da dare il tempo alla batteria interna di ricaricarsi.
E’ buona norma premere il tastino di RESET prima di iniziare a programmare il Timer. Questo tasto lo si può premere usando uno stuzzicadente o una clip per fogli dopo averla aperta.
Programmazione Ora e Giorno della Settimana
Tenere premuto il tasto con la scritta TIME sino a che NON lampeggiano più i due punti che dividono le ore dai minuti.
A questo punto potete impostare il GIORNO usando i tasti FRECCIA, sono quelli messi in orizzontale vicino alla scritta RESET.
Il giorno è in Inglese, qui sotto ci sono le equivalenze
Per passare a impostare l’ORA premete TIME e lampeggerà l’ora che modificherete usando i tasti FRECCIA.
Per passare ai MINUTI premere ancora TIME e lampeggerano i minuti che modificherete usando i tasti FRECCIA.
Per TERMINARE premere a lungo TIME sino a che non lampeggiano nuovamente i due punti che dividono l’Ora dai Minuti.
In alternativa aspettare circa 10 sec e il Timer rivisualizzerà l’orario (i due punti messi tra ore e minuti lampeggiano).
Programmazione EVENTI (PROG)
Al massimo si possono programmare 8 eventi.
Premere il pulsante PROG sino a che compare PROG 1 ON.
1) A questo punto si ha il display con il giorno che lampeggia e premendo i tasti FRECCIA si può scegliere il GIORNO o la SETTIMANA LAVORATIVA (Lunedì…Venerdì) o il FINE SETTIMANA (Sabato e Domenica) o l’INTERA SETTIMANA (Lunedì…Domenica).
2) A questo punto si preme TIME per passare a impostare l’ORA con i tasti FRECCIA.
3) Premere nuovamente TIME per impostare i MINUTI.
Regolare i minuti usando sempre i tasti FRECCIA.
Una volta terminata l’impostazione di PROG 1 ON premere TIME e deve comparire PROG 1 OFF.
Per impostare PROG 1 OFF ripetere i passi 1, 2 e 3.
Per passare agli altri EVENTI (PROG 2, 3,4…8) premere TIME e ripetere i passi sopra descritti.
Per uscire premere PROG per 5 sec o attender circa 10 sec e il Timer visualizzerà nuovamente l’ORA.
ATTENZIONE
Sul display del TIMER deve essere comparsa la scritta AUTO, se non fosse comparsa premere ripetutamente il tasto ON/OFF/AUTO/RND