
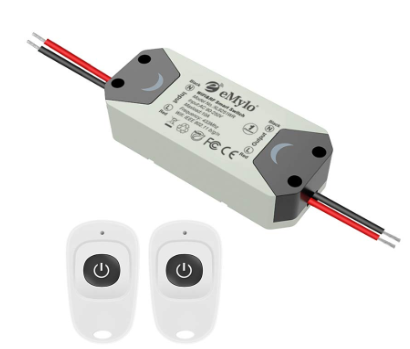
Smart Switch WIFI and 433MHz Remote Control for home appliances, lighting, etc.
You can buy this product also on BangGood, see here.
This device is compatible with Android APP:
* Smart Life (preffered app)
* Tuya Smart.
This device is also compatible with:
* Amazon ALEXA
* Google Home
* Home Assistant (isntall Tuya interface on Home Assisatn and next select Smart Life)
In this tutorial we show how to use the Smart Switch WIFI in conjunction to the 433Mhz transceiver, Smart Life and ALEXA.
The main features of the device are:
- Remote control via WiFi and 433MHz transceiver
- Max 18 WiFi accessory
- Max 4 RF 433MHz accessory
- Multiple control by multiple users
- Voice Control (Alexa and Google Home)
Installation
Configure the sensor in Smart Life APP
- We suppose that you are installed on your smartphone the app: Smart Life
- At first power on you see a Blue Led (present on the Smart Switch) that flashing.
- If the LED don’t flash, press the black button, on the device, for about 5 seconds, until the LED starts to flash quickly blue.
At this point the device is ready for registration on the Smart Life
- If the LED don’t flash, press the black button, on the device, for about 5 seconds, until the LED starts to flash quickly blue.
- On the Smart Life app press on: + and then select: Others (altri) and then Other (altro) and follow the instructions that appears on phone.
Configure the sensor in ALEXA APP
- We suppose that you are installed on your smartphone the app: Amazon Alexa
- First install the skill dedicate for Smart Life in the Amazon Alexa app
- Next chose Add Device (Aggiungi Dispositivo) and from the page that appear choose OTHER (altro) and follow the instructions that appears on phone.
Configure the 433MHz radio remote control
There are the possibility to associate your radio remote control in two different way, see below Mode 1 and Mode 2.
It’s also possible associate more four buttons.
MODE 1
To couple the 433Mhz radio control to the Smart Switch Module it is necessary to quickly press the black button (on the Smart Switch Module) for three times.
At this point the LED light turns red and then press the button on the remote control that you want to associate.
In this mode, each time the button on the remote control is pressed, the output status (on the Smart Switch Module) is switched (ON mode, then OFF, then ON, etc.).
MODE 2
By pressing the black button quickly twice instead of three, the selected RF remote control button will function as a “button” and not a switch.
In this case the device will be switched on only while we hold down the associated button and it will turn off when we leave it.
How to add a external button in parallel to Black Button
On the top there is a cable (red & black) soldered in parallel to the black button of the Smart Home Switch.
This allow the possibility to use an external button for ON/OFF the Smart Home Switch.
Pay attention, if the connection is long is suggested to use a shielded cable.
Home Assistant
For integrate this switch with Home Assistant add TUYA see here.
Tutorials, in Italian language