
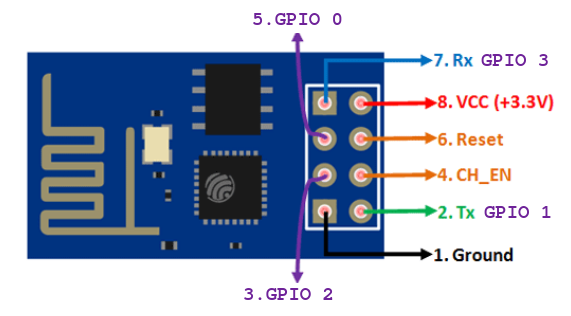
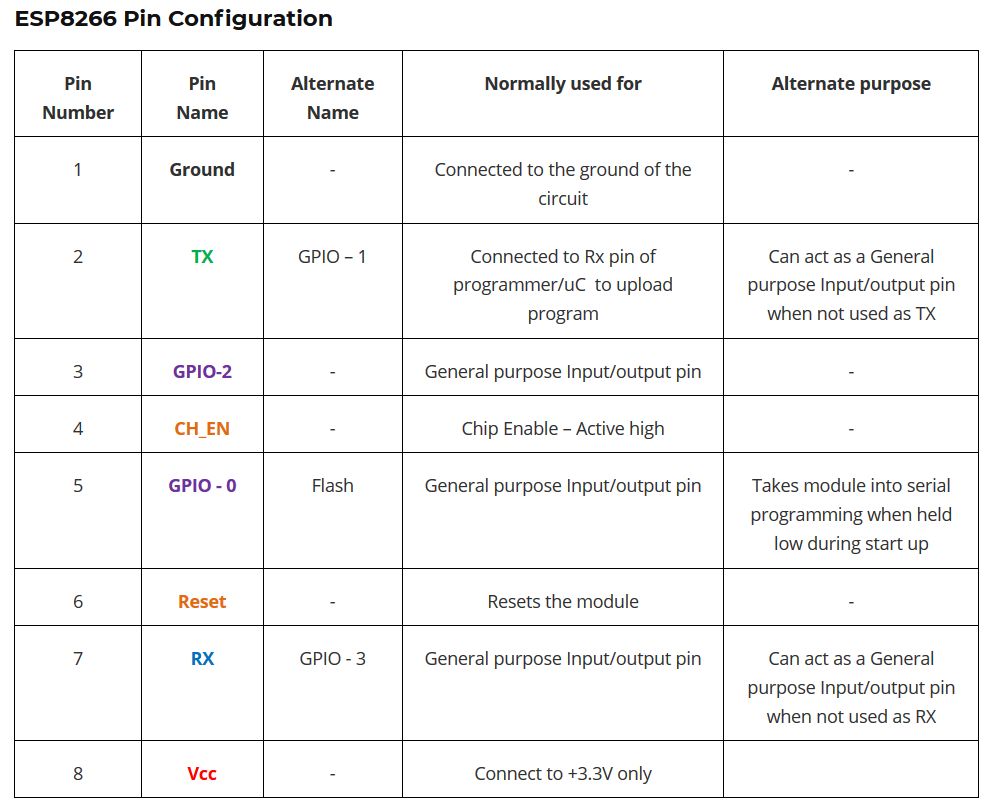
The EPS8266-01 is very cheap WiFi module that work at 3,3V and below there is the pinout.
The datasheet is here.
The schematic is here.
The datasheet of the ESP8266EX (chip used in the EPS8266-01 module) is here.
Extra info are here (from: AZ-Delivery)
You can buy it here:
The main characteristics are:
Feature:
Built-in cloud service function means that you can enter the global remote control function with three instructions. The READY message is output after power-on.
1) With free cloud service, it can only be used in LAN.
2) Support AT command to set the high and low level of IO port
3) Support AT command to read IO port level.
4) Support AT command to read ADC voltage
5) Support AT command upgrade to the latest official version of Essence
6) Support AT to set the unit to display the HOST NAME function on the computer.
7) The AT command can be executed wirelessly on the network.
8) After the subsequent power-on is supported, the APP control function is directly used.
Use the official firmware of AI-thinker Technology to achieve:
Convenient development environment, free of virtual machines and familiar with Linux system, directly developed in the Windows environment, saving development time and preempting the market in advance;
Add AT+CLDSTART to start the cloud connection.
The default parameter is the Ai-Cloud cloud platform. After executing this command, the system will automatically maintain the connection and heartbeat packet of the cloud and reconnect the disconnection. The system handles all protocol layers.
AT+CLDSTOP stops the cloud connection. Free all system resources related to the cloud. AT+CLDSEND= sends data to the cloud.
The parameter is the data length.
After executing this command, the system will return “>“, and a certain length of data can be sent at this time.
Data reception: When the cloud data comes, it will receive +CLD;
Len is the data length, and data is the specific data.
Smart connection:
AT+CWMODE=1
AT+SMARTSTART=1
At this point, use ESP_TOUCH technology to configure.
(The command “AT+CWSTARTSMART” can be used directly after version 1.2.0.
No need to set parameters.
The type of SmartConfig can be obtained automatically, no need to set.)
1. Add the cloud family group command AT+LANSTART, which can be easily added to the cloud family group and connected to the APP for control;
2. Added the exit cloud family group command AT+CLDUNBIND, module cloud control transfer? An instruction can exit the cloud family group and is no longer bound by binding;
3. Add WPS function, AT+CWWPSSTART directly open WPS, and configure WiFi connection more conveniently;
4. Add AT command AT+CIOWRITE to set IO state, one command can control different IO high and low level;
5. Add AT command AT+CIOREAD to read IO status, one command can read the status of different IO;
6. Add AT command AT+CSYSHEAP to check the remaining RAM size at any time, and the remaining space is easy to grasp;
7. Add AT command AT+CIOADC to read ADC, input voltage range is 0~1V;
Advantages of this module:
1) The smallest volume is about 11*10 mm, and the size of the fingernail. Easy to embed in any product
2) Powerful internal running LWIP protocol
3) Support three modes: AP, STA, AP+STA coexistence mode
4) Improve the simple and efficient AT command, making your development easier.
Characteristics
- Low cost, compact and powerful Wi-Fi Module
- Power Supply: 3.3V only
- Current Consumption: 100mA
- I/O Voltage: 3.6V (max)
- I/O source current: 12mA (max)
- Built-in low power 32-bit MCU @ 80MHz
- 512kB Flash Memory
- Can be used as Station or Access Point or both combined
- Supports Deep sleep (<10uA)
- Supports serial communication hence compatible with many development platform
- Can be programmed using AT-commands or Lua Script
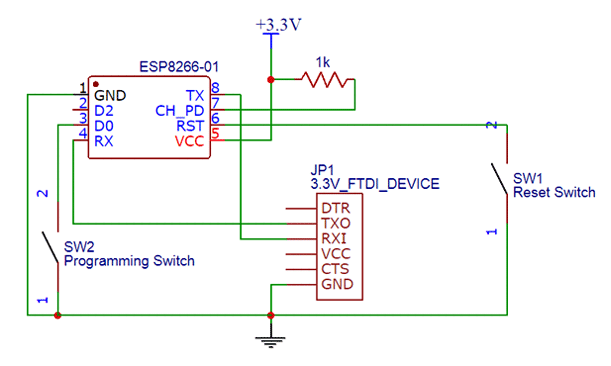
Simplified circuit diagram for using the ESP8266-01 module
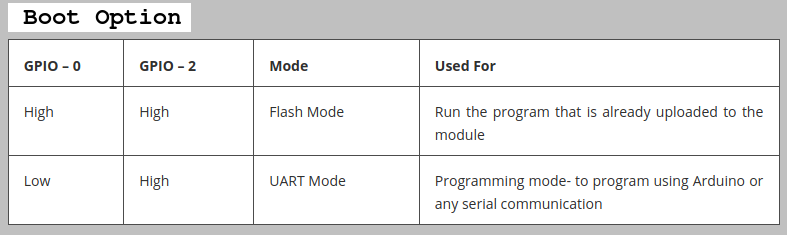
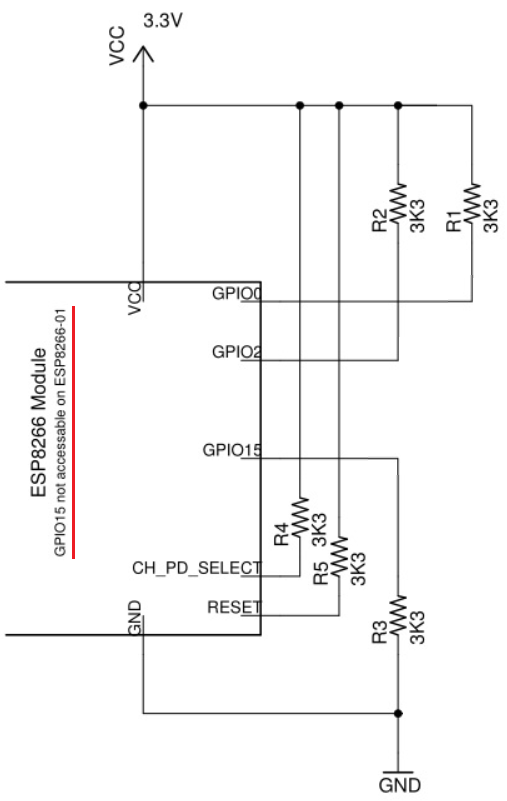
Important note for the correct PowerUp sequence
For correct PowerUp sequence, is necessary that all GPIO pins must at logic level 1 (for example via resistors of 3K3 connected to VCC, see the below schematic)
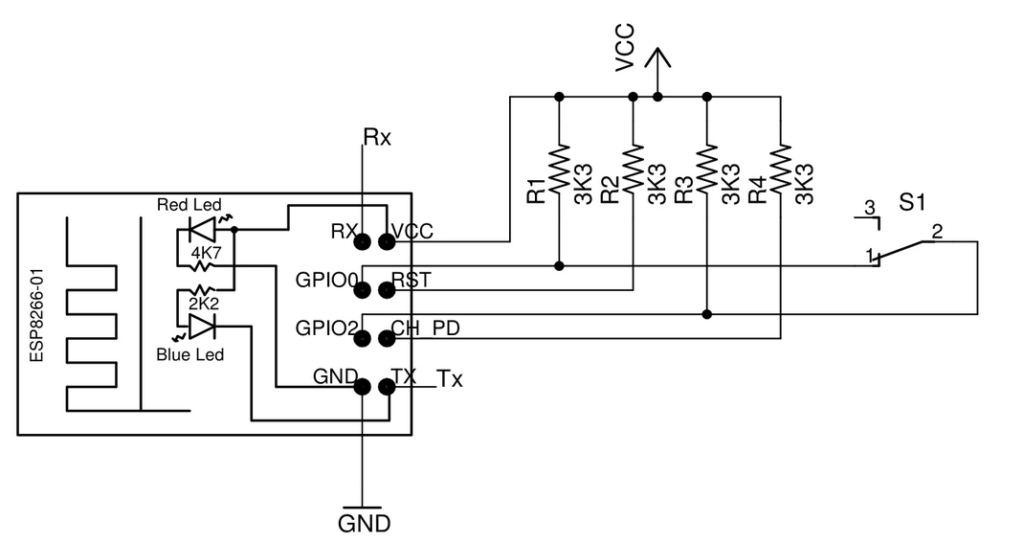
If you need to use a GPIO in INPUT mode connected to a switch (S1) and you don’t know in with position at PowerOn is the switch (S1), use the schematic below for avoid PowerOn problems.
ARDUINO
If you need to use the EPS8266-01 in conjunction at ARDUINO board see on Internet and you find a loot of explanations. For example see here or here for Italian language.
Home Assistant
If you need to use the EPS8266-01 in conjunction at Home Assistant see here.
LINK: